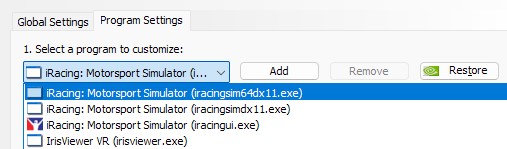
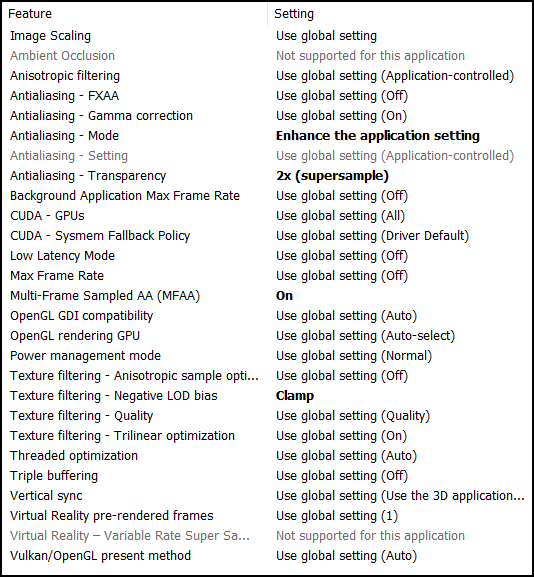
Setting up the Varjo Aero for iRacing
The OpenXR Mod
 A developer has created a mod for the original OpenXR Toolkit. It works great for racers. You wouldn’t want to use it with a flight simulator. This video by the developer describes the update and what it does. You’ll find a link to the update in the description of the video. The video might be a bit confusing, but I’ll make it simple below.
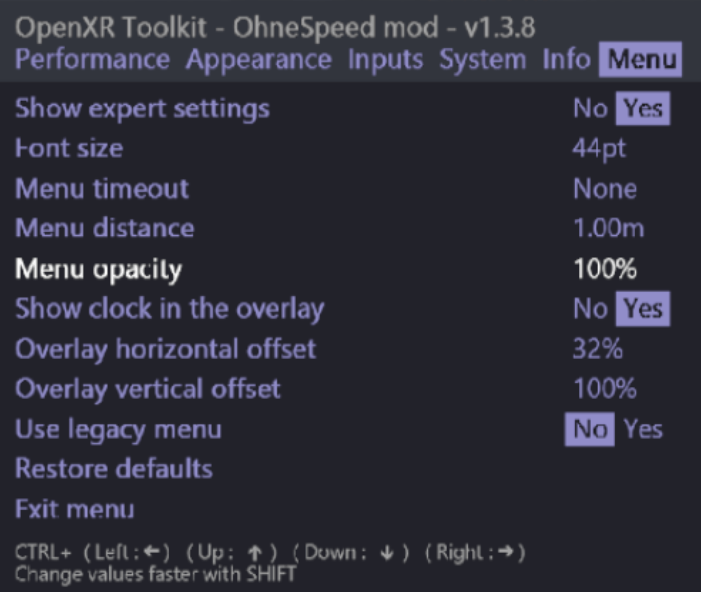
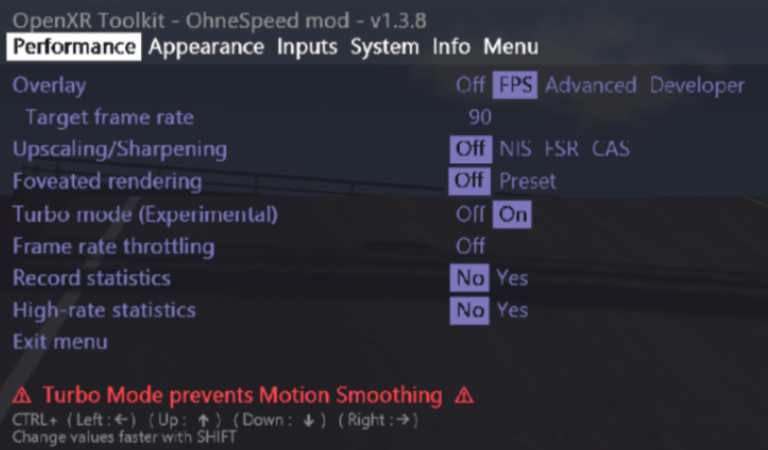
Before installing the mod, I started an iRacing session. Then opened OpenXR, turned the Advanced Overlay on and turned Turbo mode off. Now I could see my CPU/GPU percentages. I created a baseline by running a bit on track where, without the new fork, I could see the headroom left in my GPU. Now I knew where my config was before the change. Now exit everything.
Next I installed the fork. What you’ll do is unpack the zip file and copy the single DLL file over to the OpenXR program directory. The instructions are included. I recommend changing the name of the original DLL so if something goes wrong, you can easily revert. I’ve had no issues with the mod.
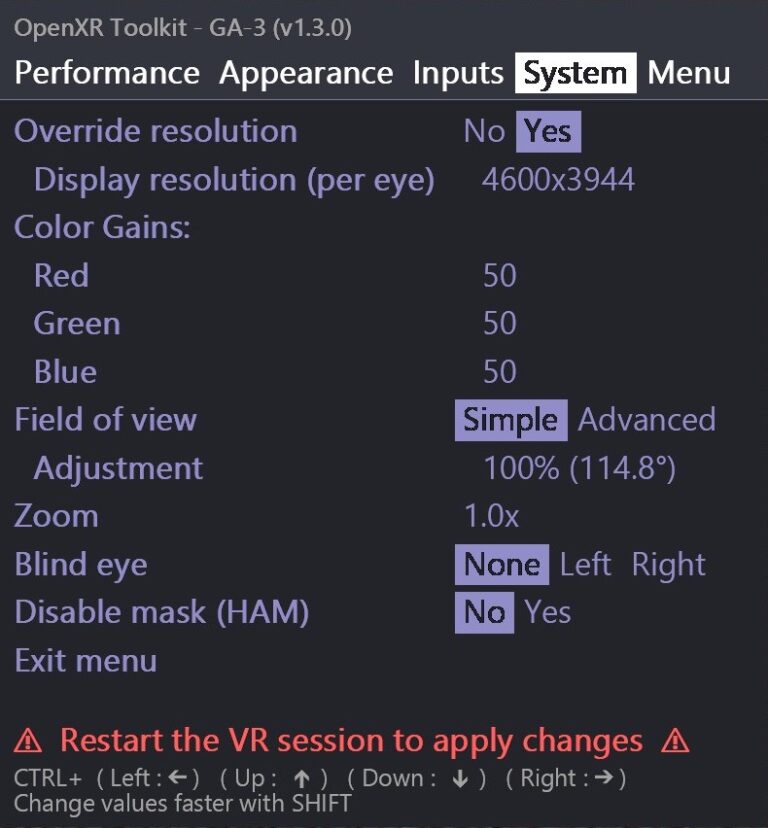
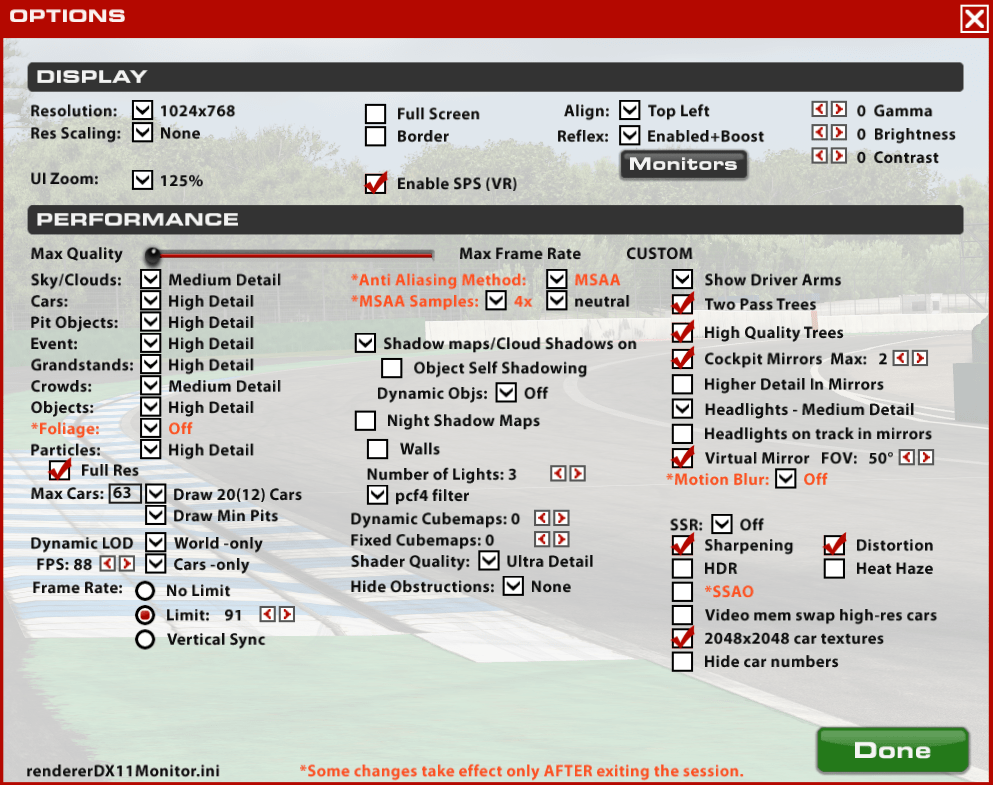
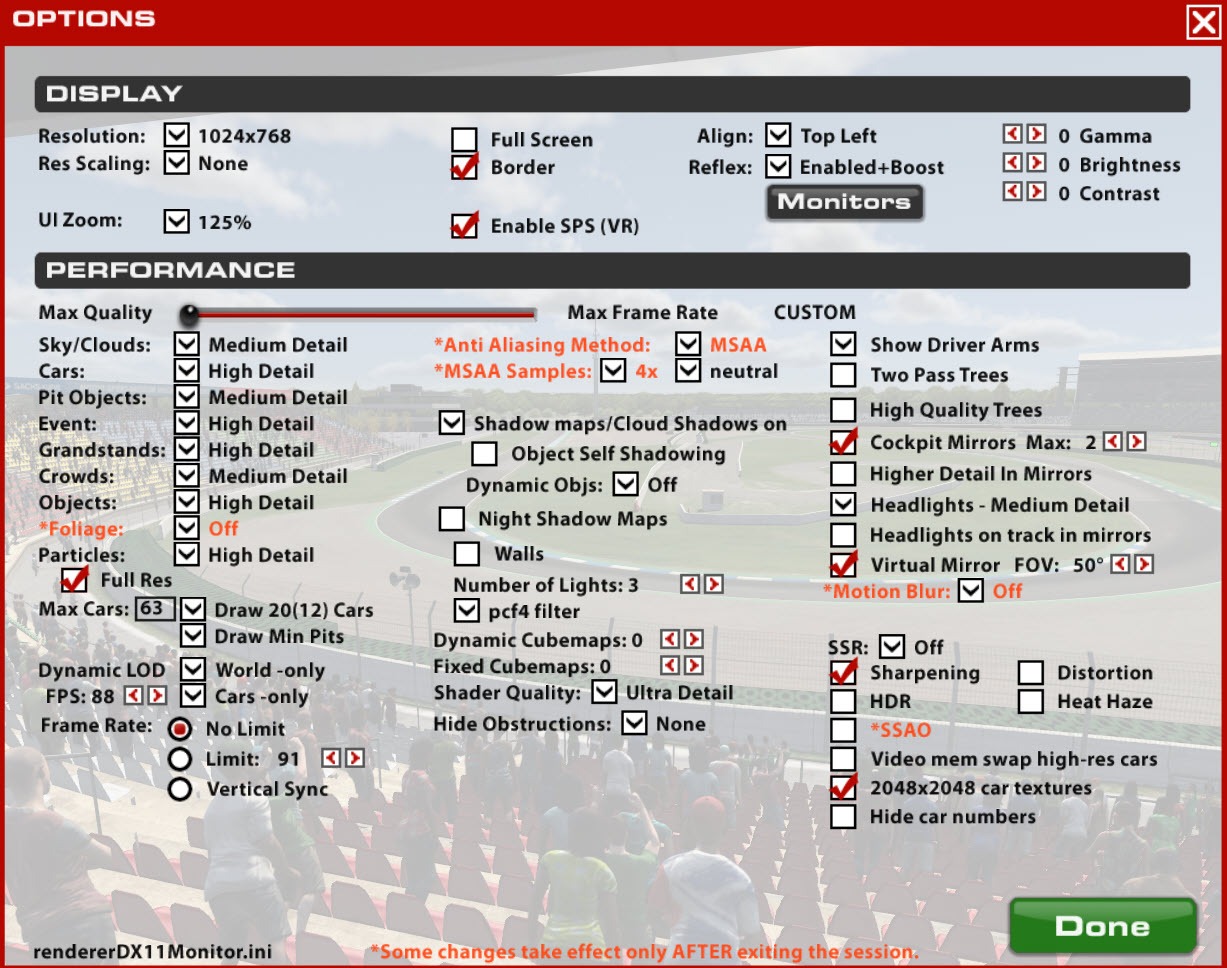
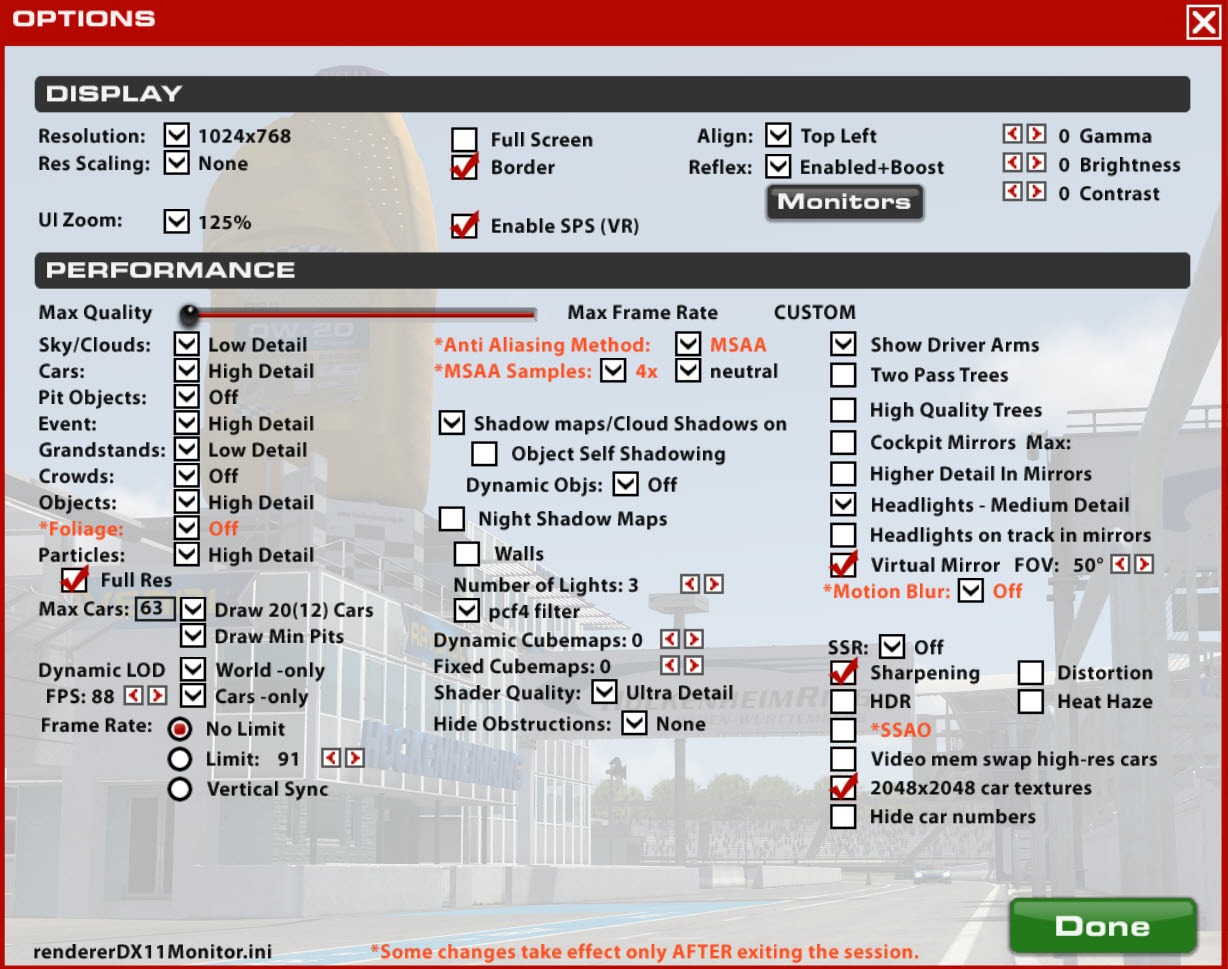
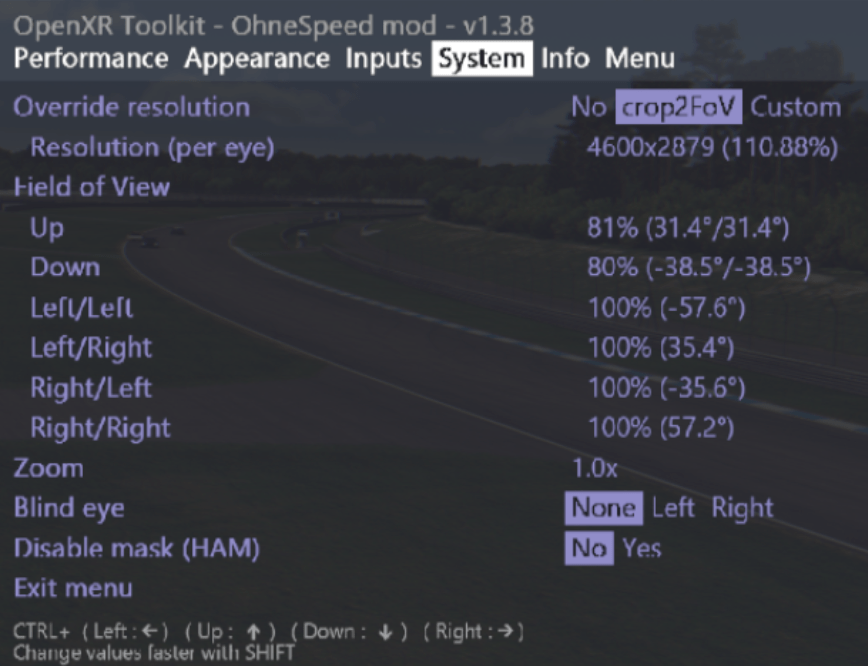
I’ve always run 4600×3944 with my 4090. Super crisp. So that’s what you are going to see here. Change it for your setup.
The mod creates a straight line cull across the top and bottom. Setting it to the amount you want, you can make it cull a lot or a little. I set the crop2FoV to 4600 and adjusted the Up and Down to 80%. Any more than that and it ruined the realism. I exited OpenXR and the sim. Restarted and gained 15-20% headroom on the GPU. NICE!

My Testing Methodology
It isn’t easy testing FPS changes in iRacing unless the setting makes a big difference. I used CapFrameX, a tool that captures the FPS and frame times. It provides very detailed information on averages, 1%, etc. In iRacing, I used the Nürburgring GP at Sunrise. I ran an AI race with 59 participants and, by skipping qualifying, I can force my car to start in position 30. To test a change, I grid and wait for my spotter to tell me the pace car is moving. At that moment, I press a key sequence to start CapFrameX logging. It does this for 40 seconds. During this 40 seconds is the pace lap before the race. In this way, I make sure the events happening around me are pretty much the same for every test. If I tested during a race, cars around me, my view on track, all kinds of variables would change.
If you have questions, I recommend the Varjo Discord community.
Digital Race Engineer (DRE)
DRE is a companion app for iRacing that, in my opinion, really helps VR racers. With DRE you get a spotter and race engineer in one. Each with their  own voice so you can easily tell them apart. I used to use Crew Chief, but I like DRE better. It has more than 50 alerts and, if you choose to use them, over 400 commands you can issue via voice. This is the best part for a VR user. I have a button on my wheel that allows me to talk to DRE as I would in real life. I can ask for information, “Car Ahead Last Lap Time”, or tell DRE to do something, “Increase Brake Bias”.
The Spotter is better in my opinion than the one in iRacing. I can get a wealth of information and control how much I want. I’m a much more aware driver with DRE.
Give DRE a try. There is a free, limited version. I personally use the Performance subscription. Use the coupon code KENTBIGDOG10 and save 10% on your subscription.
Apex This Road Racing League
If you want to race in a fun iRacing Road Racing League, check out APEX THIS. One of the larger and fastest-growing iRacing leagues. Fun without all the drama.

Ben Kraus
This is so valuable. Thanks for taking the time to put it together. Even though I’ve stopped using my Varjo Aero in favor of a Quest 3 most of these settings carry over in OpenXR. You’re a legend.
David Burns
THANK YOU THANK YOU THANK YOU!!!
I’m pretty much identical PC spec apart from i’m i9 13900k as CPU and i had moved from previous Valve Index to the Varjo Aero but my iRacing while looking sharper just felt off somehow, judders and extremely intense to race in – so much so I got some VR sickness after a 40min race and I haven’t had that feeling for years….
After following your supremely well written guide above it has completely blown me away with how it is now. Its like night and day difference and I can’t tell which I think is better, clarity or the smoothness. It actually rivals the Index at 144 feeling now 🙂
Can’t tell you how much I appreciate your guide as I was really thinking of getting rid of the Aero and going back to the Index but now its just awesome!!!!
Thanks so much
David
Andreas
Hello KentBigDog,
Thank you for the report. I tried everything possible and almost wanted to sell the Aero again. The picture is great with your settings. What surprises me, however, is that I don’t have foveated reandering as an option in OpenXR? I have the latest version. I would be very happy if you could give me a tip.
Greetings from Germany.
Andrew
KentBigDog
Did you get this figured out Andreas?
EBT
Many thanks!!
The settings for your 3080 work very well for my 4070TI and 13700 cpu
Marco B.
Nice job, man. I have my Varjo Aero for over a year and thought I was doing pretty good until I followed your guide and I’m in shock. Finally my 14900k and 4090 are giving me an experience that I was craving! It’s ironic – I was turning stuff down to try and get more FPS but apparently I needed to go in your direction and turn stuff way up. Thanks for taking the time to post this – I’m sure with the Aero coming down in price (I bought mine when they were $2300 with tax/shipping to USA) – I think I saw it recently for $900 – I’m sure there will be lots of iracer’s that are going to benefit from your helpful write-up.
Jay
I’m sorry, but I’m confused. I want to use Racelabs but I can’t get it to work correctly. “While you need SteamVR installed, you won’t run it. You also don’t want OpenVR to run. If you use Overlays (ie RaceLabs or something similar), they won’t work with OpenXR. You don’t want to run an OpenVR overlay tool like Racelabs as having OpenXR and OpenVR running at the same time will dramatically reduce your FPS”, this is what confuses me. I know I don’t have to run steam, but it sounds like I shouldn’t run open vr or xr either. What do I select in the Barjo software and iracing to use Racelabs? Thanks for your help.
KentBigDog
OpenXR and OpenVR are VR application interfaces. OvenVR was created by Steam and uses their application. OpenXR is an open standard and thus doesn’t require Steam. Racelabs uses the OpenVR interface. If you want to use Racelabs, it will use OpenVR to communicate and the associated overhead that comes with OpenVR. Using both OpenXR and OpenVR at the same time, one for the headset interface and the other for the Racelabs interface will destroy your performance. There are rumors Racelabs is working on an OpenXR interface to their tool but it doesn’t exist yet (or maybe ever). I used to us overlays too but switched to DRE for my information. I like it better than overlays. Now I just use OpenXR for my headset, no overlays, and DRE.
Graham
Thanks. Does that mean if you glance to the edge of the screen with your eyes to look at your wing mirror or black box, you will see black empty pixels instead of a sharp image?
KentBigDog
No, you don’t see any black areas when setup correctly with the OpenXR toolkit. You can adjust how much of the screen you want 100% clear. In the settings I have here, it uses a horizontal window so areas to the side are more clear. Personally, I move my head when I look in my mirrors. Maybe not fully, but I don’t just shift my eyes.
If you use eye tracking and FR culling, you will see huge black areas on screen. Not useable that way.
Graham
I’m tempted with the Aero due to recent price drop. Part of my excitement for the Aero is the eye tracking for true dynamic foveated rendering. I note you aren’t using this in favour of fixed – so if you glance to the sides you’ll be met with the blurry lower resolution. I really don’t like that effect so have never kept foveated rendering on. What was your reasoning for not using eye tracked FR? If it doesn’t work well, that’s kinda disappointing. Thanks.
KentBigDog
OpenXR Toolkit has a culling feature which gives you the best performance. You can’t use eye tracking with culling as you’ll see the culled (black) areas. So for iRacing at least, foveated rendering with culling is far superior in performance to eye tracking.
Diego
Great Guide. Thx !
What i noticed, that i had a FPS drop of app. 5 frames to 85 when a companion app (Sim Racing Studio) opened “over” iracing.
After bringing iracing to the front again, i got back to “normal” FPS on 90.
I don’t know if that makes sense but i could reproduce the behaviour…
Szabolcs lippe
This is the best tutorial for aero and iracing. I thought that my visuals were ok but after completing the steps of this tutorial i got a new game. Super tutorial thank you for sharing it.
JLowe4
Thanks for doing this. I am a tech idiot and this got me set up almost pain-free.
Thanks again.
KentBigDog
Thanks. It’s good to know it is helping people.
[email protected]
Just wanted to thank you. this is actually the first Iracing VR setup guide which really delivered what I was hoping for in terms of quality and performance using you settings. Even Daytona at night I now finally get a steady 90 FPS near the grandstands at the start of a race. I use the same hardware as you (5800X3d an RTX4090). Many thanks for taking the time to create this guide.